
This manual describes version 1.6.0 of GParted
Copyright © 2008, 2009, 2010, 2011, 2012, 2013, 2014, 2015, 2016, 2017 Curtis Gedak
Copyright © 2014, 2015, 2017, 2018, 2023 Mike Fleetwood
Permission is granted to copy, distribute and/or modify this document under the terms of the GNU Free Documentation License, Version 1.2 or any later version published by the Free Software Foundation; with no Invariant Sections, no Front-Cover Texts, and no Back-Cover Texts. You can find a copy of the GFDL at this link or at https://www.fsf.org/licensing/licenses/fdl.html or in the file COPYING-DOCS distributed with this manual.
Feedback
To report a bug or make a suggestion regarding the gparted application or this manual, follow the directions at https://gparted.org/bugs.php.
| Revision History | |
|---|---|
| Revision GParted Manual V1.13 | September 2023 |
Abstract
GParted is the GNOME Partition Editor for creating, reorganizing, and deleting disk partitions. GParted enables you to change the partition organization while preserving the partition contents.
Table of Contents
- Introduction
- Getting Started
- Viewing File System Support
- Working with Devices
- Working with Partitions
- Acquiring GParted on Live CD
- Fixing Operating System Boot Problems
- Recovering Partition Tables
The gparted application is the GNOME Partition Editor for creating, reorganizing, and deleting disk partitions.
A disk device can be subdivided into one or more partitions. The gparted application enables you to change the partition organization on a disk device while preserving the contents of the partition.
With gparted you can accomplish the following tasks:
Create a partition table on a disk device.
Enable and disable partition flags such as boot and hidden.
Perform actions with partitions such as create, delete, resize, move, check, label, copy, and paste.
Caution
Editing partitions has the potential to cause LOSS of DATA.
The gparted application is designed to enable you to edit partitions while reducing the risk of data loss. The application is carefully tested and is used by the GParted project team. However, loss of data might occur due to software bugs, hardware problems, or power failure.
You can help to reduce the risk of data loss by not mounting or unmounting partitions outside of the gparted application while gparted is running.
You are advised to BACKUP your DATA before using the gparted application. This is especially true for encrypted data where all of the data can become permanently inaccessible after a failure. Please refer to The Cryptsetup FAQ for backup and recovery advice of encrypted data.
You can start gparted in the following ways:
- menu
Choose → .
- Command line
Execute the following command: gparted
On startup, gparted will scan your computer for disk devices.
When you start gparted, the following window is displayed:
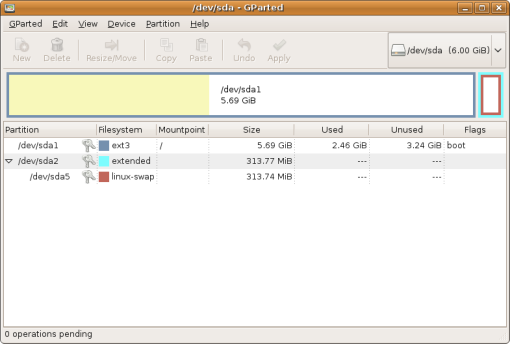
The gparted window contains the following elements:
- Menubar
The menus on the menubar contain all of the commands you need to work with disk devices and partitions in gparted.
- Toolbar
The toolbar contains a subset of the commands that you can access from the menubar.
- Graphic Display Area
The graphic display area contains the visual representation of the partitions on the selected disk device.
- Text Display Area
The text display area contains the text list of the partitions on the selected disk device.
- Statusbar
The statusbar displays information about current gparted activity or the number of operations pending.
- Device Information Pane
The device information pane displays details about the selected disk device.
By default the device information pane is not shown. To show the device information pane, choose → .
- Pending Operations Pane
The pending operations pane displays the current list of partition operations in the queue.
By default the pending operations pane is not shown when there are 0 pending operations. To show the pending operations pane, choose → .
When you left-click in either display area, you select a partition to use for partition editing actions.
When you right-click in either display area, the application displays a popup menu. The popup menu contains the most common partition editing actions.
Like other GNOME applications, actions in gparted can be performed in several ways: with the menu, with the toolbar, or with shortcut keys.
To view the actions supported on file systems, choose: → . The application displays the File System Support dialog.
If you have installed software while gparted is running, click to refresh the chart. The application refreshes the display of the chart.
To close the File System Support dialog, click .
To select a disk device, choose: → and select a device from the list. The application displays the device partition layout in the gparted window.
To view information about a disk device:
Select a disk device. See the section called “Selecting a Device”.
Select: → . The application opens a side pane in the gparted window and displays information about the device.
To close the Device Information side pane, deselect: → .
To refresh all disk devices, choose: → . The application rescans all the disk devices and refreshes the device partition layout in the gparted window.
To create a new partition table on a disk device:
Select a disk device. See the section called “Selecting a Device”.
Choose: → . The application displays a Create partition table on
/path-to-devicedialog.Optionally select a different partition table type from the list.
Note
The default partition table type is for disks smaller than 2 Tebibytes in size (assuming a 512 byte sector size) and for disks 2 Tebibytes and larger.
See the section called “Specifying Partition Type” for partition table limitations.
Note
To use a disk without a partition table, choose to create a virtual partition that spans the disk. Then format to the desired file system.
See the section called “Formatting a Partition” to format a virtual partition with a file system.
Caution
Many operating systems recognize and partition tables, but do not recognize all types of file systems. This lack of file system recognition means that using a disk without a partition table involves more risk. For example, some operating systems might prompt to format an unpartitioned disk if the file system is not recognized.
Click to create the new partition table. The application writes the new partition table to the disk device. The application refreshes the device partition layout in the gparted window.
Caution
WARNING: This will ERASE ALL DATA on the ENTIRE DISK DEVICE.
If you accidentally overwrite your partition table, see the section called “Recovering Partition Tables”.
These actions will not alter partitions on your disk device.
To select a partition, use one of the following:
Click on a partition in the graphic display area.
Click on a partition in the text display area.
The application highlights the partition in both the graphic display area and the text display area in the gparted window.
Note
Partition operations such as delete, move, copy, format, check, label, and often resize require the partition to be unmounted. See the section called “Unmounting a Partition”.
To select unallocated space, use one of the following:
Click on unallocated in the graphic display area.
Click on unallocated in the text display area.
The application highlights the unallocated space in both the graphic display area and the text display area in the gparted window.
Tip
If you do not have any disk devices with unallocated space, you might try the following:
Add a new disk device to your computer.
Shrink a partition that contains unused space. See the section called “Resizing a Partition”.
To view information about a partition:
Select a partition. See the section called “Selecting a Partition”.
Choose: → . The application opens an Information about
/path-to-partitiondialog.
To close the Information about
/path-to-partition dialog,
click .
To mount a partition:
Select an unmounted partition. See the section called “Selecting a Partition”.
Choose: → and select a mount point from the list. The application mounts the partition on the mount point and refreshes the device partition layout in the gparted window.
Note
If → is not visible, then gparted does not know where the partition should be mounted.
To unmount a partition:
Select a mounted partition. See the section called “Selecting a Partition”.
Choose: → . The application unmounts the partition from the mount point and refreshes the device partition layout in the gparted window.
Tip
If → does not succeed, then the partition is probably in use.
To have all partitions unmounted and available for partition editing actions, boot from a Live CD and use gparted. See the section called “Acquiring GParted on Live CD”
To open a LUKS encrypted partition:
Select a closed LUKS encrypted partition. See the section called “Selecting a Partition”.
Choose: → .
If gparted doesn't yet know the LUKS Passphrase it will open a LUKS Passphrase
/path-to-partitiondialog. Type the LUKS Passphrase into the Passphrase text box and click .The application opens the encrypted partition and refreshes the device partition layout in the gparted window.
Note
gparted remembers each LUKS Passphrase in the computer's memory for as long as it is running. This is so that it doesn't have to prompt when reopening the same encrypted partition again. When gparted is closed all remembered LUKS Passphrases are cleared from memory and forgotten.
To close a LUKS encrypted partition:
Select an unmounted and LUKS encrypted partition. See the section called “Selecting a Partition”.
Choose: → . The application closes the LUKS encryption and refreshes the device partition layout in the gparted window.
These actions will alter partitions on your disk device. These actions will not modify the start or end boundaries of your existing partitions.
To create a new partition:
Select an unallocated space on the disk device. See the section called “Selecting Unallocated Space”.
Choose: → . The application displays the Create new Partition dialog.
Specify the size and the location for the partition. See the section called “Specifying Partition Size and Location”.
Specify the alignment for the partition. See the section called “Specifying Partition Alignment”.
Specify the type of partition. See the section called “Specifying Partition Type”.
Specify the name of the partition when the field is enabled. See the section called “Specifying Partition Name”.
Specify the type of file system for the partition. See the section called “Specifying Partition File System”.
Specify the label of the file system for the partition. See the section called “Specifying Partition File System Label”.
Click to add the create partition operation to the operation queue. The application displays the create partition operation in the Pending Operations pane in the gparted window.
To delete a partition:
Select an unmounted partition. See the section called “Selecting a Partition”.
Choose: → . The application displays the delete partition operation in the Pending Operations pane.
Caution
If you delete a logical partition, then all existing logical partitions after the deleted logical partition will experience changes in device names.
For example, an extended partition contains four logical partitions A, B, C, and D. These logical partitions are accessed by the operating system as follows:
Partition A as /dev/sda5.
Partition B as /dev/sda6.
Partition C as /dev/sda7.
Partition D as /dev/sda8.
If partition B is deleted, then the remaining logical partitions will be accessed by the operating system as follows:
Partition A as /dev/sda5.
Partition C as /dev/sda6. Note the change in device name.
Partition D as /dev/sda7. Note the change in device name.
Changes in a device name can cause problems if a partition is mounted using a device name. You can avoid the problem by using the file system label or Universally Unique Identifier (UUID) of the partition when mounting the partition.
Changes in a device name might adversely affect the following files:
/etc/fstab - Contains a list of file systems to mount.
/boot/grub/menu.lst - Contains operating system boot instructions for the grub boot loader.
Note
Disks with or partition tables do not contain a partition table, and do not contain partitions. A file system on a disk without a partition table is represented in GParted by a virtual partition.
To delete the file system and virtual partition, choose format to .
Note
Naming of partitions is only available with GUID partition tables (GPT).
Also see the section called “Creating a New Partition Table”.
To set a name of a partition:
Select an unmounted partition. See the section called “Selecting a Partition”.
Choose: → . The application opens a Set partition name on
/path-to-partitiondialog.Type a partition name in the Name text box.
Click . The application displays the set partition name operation in the Operations Pending pane.
To format a partition:
Select an unmounted partition. See the section called “Selecting a Partition”.
Choose: → , and select a type of file system from the list. The application displays the format partition operation in the Operations Pending pane.
See the section called “Specifying Partition File System” for the meaning of the file system type.
To set a label or a volume name of a file system in a partition:
Select an unmounted partition. See the section called “Selecting a Partition”.
Choose: → . The application opens a Set file system label on
/path-to-partitiondialog.Type a label name in the Label text box.
Click . The application displays the set file system label operation in the Operations Pending pane.
To change the Universally Unique Identifier (UUID) of a partition:
Select an unmounted partition. See the section called “Selecting a Partition”.
Choose: → . The application displays the set a new random UUID operation in the Operations Pending pane.
Warning
Changing the UUID might invalidate the Windows Product Activation key (WPA).
On FAT and NTFS file systems, the Volume Serial Number is used as UUID. Changing the Volume Serial Number on the Windows system partition, normally C:, might invalidate the WPA key. An invalid WPA key will prevent login until you reactivate Windows.
In an attempt to avoid invalidating the WPA key, on NTFS file systems only half of the UUID is set to a new random value. On FAT file systems, such a precaution is not possible.
The WPA key should not be affected by changing the UUID of data partitions or removable media partitions. In rare cases, a partition that is present at boot time might be an exception to this rule.
Warning
Changing the UUID when there is no need to do so might cause a GNU/Linux system to fail to boot, or to fail to mount a file system.
Changing the UUID is only required after copying a partition. The UUID change is needed to prevent duplicate UUIDs when both the source and the copy of the partition are used on the same computer.
If boot or mount problems occur you might need to edit configuration files, such as /etc/fstab, and regenerate the grub menu to ensure that the correct UUID is specified.
Specifying partition details is useful when performing actions such as create, resize, and move.
To specify the size and the location of the partition, use one or a combination of the following:
Click-and-hold the arrow at either end of the graphic area. Drag the arrow left or right within the display range.
Click-and-hold the middle of the partition in the graphic area. Drag the partition left or right within the display range.
Click the spin button arrows, or type numeric values to adjust the following fields:
Free Space Preceding
New Size
Free Space Following
The application refreshes both the graphic area and the numbers beside the three field labels.
To specify the alignment of the partition, click the Align to arrow button, and select from the list.
Use MiB alignment for modern operating systems. This setting aligns partitions to start and end on precise mebibyte (1,048,576 byte) boundaries. MiB alignment provides enhanced performance when used with RAID systems and with Solid State Drives, such as USB flash drives.
Use Cylinder alignment to maintain compatibility with operating systems released before the year 2000, such as DOS. This setting aligns partitions to start and end on disk cylinder boundaries.
Tip
The Cylinder/Head/Sector values reported by modern disk devices no longer have a direct physical relationship to the data stored on the disk device. Hence it is no longer valid to use this alignment setting to achieve enhanced performance.
Use None only if you have an in-depth knowledge of disk structure, partition tables, and boot records. This setting places partition boundaries relative to the end of any immediately preceding partition on the disk device. This setting is not guaranteed to reserve or respect space required for boot records.
To specify the partition type, click the Create as arrow button, and select from the list.
Note
The msdos partition table limits partitions as follows:
Maximum of 4 primary partitions.
Maximum of 3 primary partitions, and 1 extended partition.
The extended partition can contain multiple logical partitions. Some GNU/Linux distributions support accessing at most 15 partitions on a disk device.
Maximum size of a partition is 2 Tebibytes using a sector size of 512 bytes. The partition must also start within the first 2 Tebibytes of the disk device.
Tip
Primary partitions provide better data recoverability because the partition boundaries are stored at known locations on the disk device.
Note
Naming of partitions is only available with GUID partition tables (GPT). Therefore the field is only enabled on disk devices partitioned using GPT.
Also see the section called “Creating a New Partition Table”.
To specify the partition name, type the name in the Partition name text box.
To specify the type of file system for the partition, click the File System arrow button, and select from the list.
Note
Examples of uses for some file systems are as follows:
, and file systems can be used for installing GNU/Linux, and for data.
can be used with GNU/Linux to increase the virtual memory of your computer.
and file systems can be used to share data between free and commercial operating systems.
can be used to clear any existing file system signatures and ensure that the partition is recognised as empty.
can be used to just create a partition without writing a file system.
To specify the file system label in the partition, also known as a volume label, type a label name in the Label text box.
Tip
File system labels can be used to help you remember what is stored in the partition.
Unique labels can be used to mount file systems with the GNU/Linux operating system.
These actions will alter partitions on your disk device. These actions might modify the start or end boundaries of your existing partitions. These actions might cause operating systems to fail to boot.
Resizing and moving a partition can be performed by a single gparted operation.
To resize a partition:
Select a partition. See the section called “Selecting a Partition”.
Tip
Unmounted or inactive partitions enable the most resize options.
Support is available for online resize of some mounted or otherwise active partitions. However this support is often limited to grow only.
Choose: → . The application displays the Resize/Move
/path-to-partitiondialog.Adjust the size of the partition. See the section called “Specifying Partition Size and Location”.
Tip
If you do not want the start of an existing partition to move, then do not change the free space preceding value. If the partition is mounted or otherwise active, then you will not be able to change the free space preceding value.
Specify the alignment of the partition. See the section called “Specifying Partition Alignment”.
Click . The application displays the resize/move partition operation in the Pending Operations pane.
Examine the operation that was added to the Pending Operations pane.
If the operation involves a move step, then consider the following:
A move step might take a long time to complete.
If the partition is an operating system boot partition, then a move step might cause the operating system to fail to boot.
If you are not prepared to wait or to fix potential operating system boot problems, then you might want to undo the operation. See the section called “Undoing Last Operation”.
Tip
To grow or move a partition, unallocated space must be available adjacent to the partition.
If you are growing a logical partition, then the unallocated space must be within the extended partition.
If you are growing a primary partition, then the unallocated space must not be within the extended partition.
You can move unallocated space to be inside or outside of the extended partition by resizing the extended partition boundaries.
Tip
A LUKS encrypted partition and the file system within can only be resized when the encryption mapping is open.
Tip
To improve the ability to shrink NTFS partitions, you might consider one or more of the following:
Defragment the file system.
Booting into Safe Mode with the commercial operating system that uses NTFS can improve the ability to defragment the file system. To enter Safe Mode press F8 while your computer is booting the operating system.
Check the partition for errors with the following command:
C:>chkdsk /f /rRemember to reboot back into the commercial operating system that uses NTFS to allow the chkdsk command to execute.
Temporarily disable the paging file. The paging file occupies a fixed location in the partition that the defragmentation process is unable to move.
Temporarily move large files to another partition or disk device. Large files are defined as greater than a few hundred Megabytes (MB).
Ensure a proper shut down of the commercial operating system that uses NTFS before you resize the NTFS partition
Leave at least 10 percent unused space in the NTFS partition. If you shrink the partition too much, then the commercial operating system might have difficulty functioning properly.
Reboot twice into the commercial operating system that uses NTFS after shrinking the NTFS partition.
Moving and resizing a partition can be performed by a single gparted operation.
To move a partition:
Select an unmounted partition. See the section called “Selecting a Partition”.
Choose: → . The application displays the Resize/Move
/path-to-partitiondialog.Adjust the location of the partition. See the section called “Specifying Partition Size and Location”.
Specify the alignment of the partition. See the section called “Specifying Partition Alignment”.
Click . The application displays the resize/move partition operation in the Pending Operations pane.
Tip
If the partition is an operating system boot partition, then the operating system might not boot after the move operation is applied.
If the operating system fails to boot, see the section called “Fixing Operating System Boot Problems”.
Tip
A LUKS encrypted partition can only be moved when the encryption mapping is closed.
To copy a partition:
Select an unmounted partition. See the section called “Selecting a Partition”.
Choose: → . The application marks the partition as the source partition.
To Paste a partition:
Select an unallocated space on a disk device. See the section called “Selecting Unallocated Space”.
Choose: → . The application displays the Paste
/path-to-partitiondialog.If you want you can adjust the size and location of the partition. See the section called “Specifying Partition Size and Location”.
If you want you can specify the alignment of partition. See the section called “Specifying Partition Alignment”.
Click . The application displays the copy partition operation in the Pending Operations pane.
Caution
The copy of the partition has the same file system label and Universally Unique Identifier (UUID) as the source partition. This can cause a problem when booting, or when mount actions use the file system label or UUID to identify the partition.
The problem is that the operating system will randomly select to mount either the source, or the copy of the partition. For example, on the first mount action the source partition might be mounted. On the next mount action the copy of the partition might be mounted. Over time this random nature of partition mounting might make files seem to mysteriously appear or disappear depending upon which partition is mounted. Random mounting of the source or the copy of the partition might also cause severe data corruption or loss.
To avoid the problem you are advised to do one of the following:
After you have queued or applied the copy operation:
Change the UUID of either the source, or the copy of the partition. See the section called “Changing a Partition UUID”.
If the file system label is not blank then change the file system label of either the source, or the copy of the partition. See the section called “Setting a Partition File System Label”.
After you have applied the copy operation, delete or reformat the source partition.
Use some other method to ensure that the source partition and the copy of the partition are not used on the same computer at the same time. For example, if the copy of the partition is on a separate drive then remove the drive from the computer.
Tip
The file system within a LUKS encrypted partition can only be copied when the encryption mapping is open.
Note
To prevent unintended decryption of data, pasting into unallocated space creating a new partition is not permitted. However a LUKS encrypted partition can be pasted into an existing open LUKS encrypted partition maintaining an encrypted, or pasted into a plain partition making an unencrypted copy of the file system.
To manage partition flags:
Select a partition. See the section called “Selecting a Partition”.
Choose: → . The application opens a Manage flags on
/path-to-partitiondialog.To enable a flag, select the check box beside the flag. The application writes the enabled flag to the partition and refreshes the Manage flags on
/path-to-partitiondialog.To disable a flag, deselect the check box beside the flag. The application writes the disabled flag to the partition and refreshes the Manage flags on
/path-to-partitiondialog.
Note
is only available for disks with partition tables. Disks with or partition tables do not contain a partition table, and do not have partition flags.
See the section called “Viewing Device Information” to view the type of partition table.
To close the Manage flags on
/path-to-partition dialog,
click .
Note
A description of flags in an msdos partition table follows:
Boot is used by some commercial operating system boot loaders. The boot flag indicates the partition is active or bootable. Only one partition on a disk device can be active.
Diag is used to indicate the partition is used for diagnostics / recovery.
ESP indicates an EFI System Partition used to boot computers with the Unified Extensible Firmware Interface (UEFI) class 2 that includes compatibility support for BIOS functions including the MBR partition structure.
Hidden is used by some commercial operating systems. The hidden flag makes the partition invisible to the operating system.
Irst identifies an Intel Rapid Start Technology partition.
LBA is used by some commercial operating system boot loaders. The LBA flag indicates the partition should be accessed using Logical Block Addressing (LBA), instead of Cylinder-Head-Sector (CHS) addressing.
LVM is used to indicate the partition is used by a Logical Volume Manager (LVM).
Palo is used by the Precision Architecture - Reduced Instruction Set Computing (PA-RISC) boot loader, palo.
Prep is used to indicate the boot partition on Power Performance Computing (PowerPC) hardware.
RAID is used to indicate the partition is used in a Redundant Array of Inexpensive Disks (RAID).
Note
A description of flags in a gpt partition table follows:
Atvrecv is used to indicate an Apple TV Recovery partition.
BIOS_GRUB indicates a BIOS boot partition often used by the GRUB 2 boot loader.
Boot is used by some commercial operating system boot loaders. The boot flag indicates the partition is active or bootable. Only one partition on a disk device can be active.
Diag indicates the partition is used for diagnostics or recovery.
ESP indicates an EFI System Partition used to boot computers with Extensible Firmware Interface (EFI) class 1 or Unified Extensible Firmware Interface (UEFI) class 2 or UEFI class 3.
Hidden is used by some commercial operating systems. The hidden flag makes the partition invisible to the operating system.
HP-service is used to indicate a Hewlett Packard service partition.
Irst identifies an Intel Rapid Start Technology partition.
Legacy_boot is used by some special purpose software to indicate the partition might be bootable.
LVM indicates the partition is used by a Logical Volume Manager (LVM).
Msftdata identifies partitions that contain Microsoft file systems such as NTFS or FAT.
Msftres is used to indicate a Microsoft Reserved partition.
Prep is used to indicate the boot partition on Power Performance Computing (PowerPC) hardware.
RAID indicates the partition is used in a Redundant Array of Inexpensive Disks (RAID).
Checking a partition will attempt to find and fix problems in the file system. Checking a partition will attempt to grow the file system to fill the partition.
To check a partition:
Select an unmounted partition. See the section called “Selecting a Partition”.
Choose: → . The application displays the check partition operation in the Pending Operations pane.
To undo the last operation in the operation queue, choose: → . The application removes the last operation from the queue displayed in the Pending Operations pane. If there are no operations remaining in the queue, the application closes the Pending Operations pane.
To clear all operations in the operation queue, choose: → . The application removes all operations from the queue and closes the Pending Operations pane.
To apply all operations:
Choose: → . The application displays an Apply operations to device dialog.
Caution
Editing partitions has the potential to cause LOSS of DATA. You are advised to backup your data before applying your partition editing operations.
Click . The application displays an Applying pending operations dialog. The application applies each pending operation in the order you created the operations. The application displays a status update when each operation is completed.
To view more information, click . The application displays more details about operations.
To view more information about the steps in each operation, click the arrow button beside each step.
To stop the operations while they are executing, click . The application displays a disabled button and counts down for 5 seconds.
Note
instructs the application to stop or roll back operations as necessary to ensure data integrity.
If operations have not halted after 5 seconds the application enables the button.
To force the operations to stop, click . The application displays a warning dialog.
Click to allow the roll back operations to complete, or click to cancel the roll back operations.
Warning
terminates the safe roll back of operations and might cause SEVERE file system damage and data loss. You are advised to click to allow the roll back to complete.
When the application finishes performing operations, the application displays the button and the button.
If you want to save the details from applying all operations, then click . The application displays a Save Details dialog.
If you want to change the default file name, then type a file name in the Name text box.
If you want to save the file in a folder different than /root, click . The application displays a file system navigator.
Use the file system navigator to select a folder.
Click to save the file. The application saves the details file.
Caution
If you use gparted from a Live CD, then the root file system exists in RAM memory. All files saved to the Live CD root file system will be lost when you shut down the computer.
If you saved the gparted details to the Live CD root file system, then you need to copy the file to more permanent storage. Examples of more permanent storage are a hard disk drive or a USB flash memory drive.
Click . The application closes the Applying pending operations dialog. The application rescans all the disk devices and refreshes the device partition layout in the gparted window.
A Live CD is a Compact Disc that contains a bootable operating system. A Live CD enables you to boot your computer from the CD.
Using gparted from a Live CD has the following advantages:
You can edit all of your partitions because the partitions are not mounted.
You can edit partitions on computers that do not have a bootable operating system.
The gparted application is available on many Live CD distributions.
You can download a Live CD image containing gparted from the following web sites:
GParted Live CD https://gparted.org/livecd.php
SystemRescue (also known as SystemRescueCD) https://www.system-rescue.org
Tip
The GParted Live CD image can be written to a USB flash drive.
If your computer can boot from Universal Serial Bus (USB) then you might prefer to boot and use gparted from a USB flash drive.
Tip
To avoid wasting a blank CD when burning a CD image file, use the following tips:
Ensure the checksum of the downloaded file matches the checksum posted on the download page.
Be sure to burn the .iso file as an image to the blank CD. If you burn the .iso file as data to a blank CD then the CD will not boot in your computer.
Your computer might fail to boot an operating system when you perform one of the following actions:
Delete a partition.
Move a partition.
Install another operating system and overwrite the Master Boot Record (MBR).
Fortunately the failure to boot can be often be fixed.
If your computer uses the GRUB boot loader, see the section called “Fixing GRUB boot problem” to restore the ability to boot.
If your computer does not use GRUB then you are advised to consult documentation for your boot loader to learn how to fix the problem. You might consult the GParted FAQ, or the GParted forum. You might also search the Internet to learn how other people have solved similar problems.
The Grand Unified Boot loader (GRUB) is used by many GNU/Linux distributions. To fix GRUB boot problems you start by determining which major version of GRUB was used.
There are two major versions of GRUB:
GRUB, also known as GRUB 2, covers versions 1.98 and higher. GRUB 2 works with both GUID partition tables (GPT) and msdos partition tables.
GRUB Legacy, traditionally known as GRUB, covers versions 0.9x and earlier. GRUB Legacy works with msdos partition tables only.
GRUB 2 is used as the default boot loader in the following GNU/Linux distributions:
CentOS 7 and higher
Debian 6 (Squeeze) and higher
Fedora 16 (Verne) and higher
openSUSE 12.2 and higher
Ubuntu 9.10 (Karmic Koala) and higher
If you are unsure whether your computer uses GRUB 2 or GRUB Legacy, you might try searching for the answer on the Internet.
Use the following steps to restore the GRUB 2 boot loader:
Boot from Live media such as GParted Live or your GNU/Linux distribution image. Open a terminal window.
Determine which partition contains the / file system for your GNU/Linux distribution.
Use GParted to list the partitions on your disk device. Look for a partition that contains your GNU/Linux / file system. This Linux partition will likely use a file system such as ext2, ext3, ext4, or btrfs.
Note
If the / partition is on LVM then the Logical Volume Manager must be active. LVM can be started with the command:
#vgchange -a yWith LVM, the equivalent of a disk partition is a Logical Volume. Logical Volumes can be listed with the command:
#lvscanNote
If the / partition is on RAID, then the RAID must be active. Linux Software RAID can be started with the command:
#mdadm --assemble --scanCreate a mount point directory by entering (as root):
#mkdir /tmp/mydirMount the / partition on the mount point directory. For example assume the / file system is contained in the /dev/sda5 partition. Enter (as root):
#mount/dev/sda5/tmp/mydirIf you have a separate /boot partition, for example at /dev/sda3, then an extra step is required. Mount the /boot partition at /tmp/mydir/boot by entering (as root):
#mount/dev/sda3/tmp/mydir/bootNote
If you do not know whether you have a separate boot partition then you probably do not and can ignore this step.
Prepare to change the root environment by entering (as root):
#mount --bind /dev /tmp/mydir/dev#mount --bind /proc /tmp/mydir/proc#mount --bind /sys /tmp/mydir/sysChange the root environment by entering (as root):
#chroot /tmp/mydirReinstall GRUB 2 on the boot device. Note that the device name is used and not the partition name. For example, if the / partition is /dev/sda5 then the device is /dev/sda.
For Debian, Ubuntu, and other offshoot GNU/Linux distributions, enter the command (as root):
#grub-install/dev/sdaFor CentOS, Fedora, openSUSE and other offshoot GNU/Linux distributions, enter the command (as root):
#grub2-install/dev/sdaExit the chroot environment by entering (as root):
#exitReboot your computer.
Use the following steps to restore the GRUB Legacy boot loader:
Boot from Live media such as your GNU/Linux distribution image. Open a terminal window.
Note
The Live media must contain the GRUB Legacy boot loader. If your GNU/Linux distribution uses GRUB Legacy, then the distribution Live media will also contain GRUB Legacy.
Start the grub application from the command line (as root).
#grubFind where grub stage1 is located by using one of the following:
If the /boot folder is stored in the / partition, use the command:
grub>find /boot/grub/stage1If the /boot folder is stored in a partition different than the / partition, use the command:
grub>find /grub/stage1The output from the find command might look like the following:
(hd0,0)If more than one line is listed in the command output, you will need to decide which device you use for grub.
Set the grub root device by specifying the device returned by the find command. This should be the partition containing the boot directory.
grub>root(hd0,0)Reinstall the grub boot loader into the Master Boot Record (MBR) with:
grub>setup(hd0)If you want to install the grub boot loader into the boot sector of a partition, instead specify a partition with:
grub>setup(hd0,0)Exit grub.
grub>quitReboot your computer.
If you accidentally overwrite your partition table, there is a chance that you might be able to recover it.
The testdisk application is designed to help recover lost partitions. For more information about testdisk, see https://www.cgsecurity.org/wiki/TestDisk.
If no partitions are found, you have other options to try to rescue your data. The photorec application is designed to help recover many different types of lost files. For more information about photorec, see https://www.cgsecurity.org/wiki/PhotoRec.
Both testdisk and photorec applications are included on each Live CD listed in the section called “Acquiring GParted on Live CD”.
