
Manual ini menjelaskan versi 0.31.0 dari GParted
Hak Cipta © 2008, 2009, 2010, 2011, 2012, 2013, 2014, 2015, 2016, 2017 Curtis Gedak
Hak Cipta © 2014, 2015, 2017, 2018 Mike Fleetwood
Hak Cipta © 2020, 2022 Andika Triwidada
Izin diberikan untuk menyalin, mendistribusikan, dan/atau memodifikasi dokumen ini berdasarkan ketentuan GNU Free Documentation License, Versi 1.2 atau versi yang lebih baru yang diterbitkan oleh Free Software Foundation; tanpa Bagian Invariant, tanpa Teks Sampul Depan, dan tanpa Teks Sampul Belakang. Anda dapat menemukan salinan GFDL di tautan ini atau di https://www.fsf.org/licensing/licenses/fdl.html atau di berkas COPYING-DOCS yang didistribusikan dengan manual ini.
Umpan balik
Untuk melaporkan bug atau membuat saran mengenai aplikasi gparted atau manual ini, ikuti petunjuk di https://gparted.org/bugs.php.
| Riwayat Revisi | |
|---|---|
| Revisi Manual GParted V1.12 | Mei 2018 |
Abstrak
GParted adalah Penyunting Partisi GNOME untuk membuat, mengatur ulang, dan menghapus partisi disk. GParted memungkinkan Anda untuk mengubah organisasi partisi sambil mempertahankan konten partisi.
Daftar Isi
Aplikasi gparted adalah Penyunting Partisi GNOME untuk membuat, mengatur ulang, dan menghapus partisi disk.
Perangkat disk dapat dibagi menjadi satu atau beberapa partisi. Aplikasi gparted memungkinkan Anda untuk mengubah organisasi partisi pada perangkat disk sambil mempertahankan isi partisi.
Dengan gparted Anda dapat menyelesaikan tugas-tugas berikut:
Membuat tabel partisi pada perangkat disk.
Aktifkan dan nonaktifkan flag partisi seperti boot dan tersembunyi.
Melakukan tindakan dengan partisi seperti membuat, menghapus, mengubah ukuran, memindahkan, memeriksa, melabeli, menyalin, dan menempel.
Perhatian
Menyunting partisi berpotensi menyebabkan HILANGNYA DATA.
Aplikasi gparted dirancang untuk memungkinkan Anda menyunting partisi sambil mengurangi risiko kehilangan data. Aplikasi ini diuji dengan hati-hati dan digunakan oleh tim proyek GParted. Namun, hilangnya data mungkin terjadi karena bug perangkat lunak, masalah perangkat keras, atau kegagalan daya.
Anda dapat membantu mengurangi risiko kehilangan data dengan tidak memasang atau melepas kait partisi di luar aplikasi gparted saat gparted sedang berjalan.
Anda disarankan untuk MEMBUAT CADANGAN DATA Anda sebelum menggunakan aplikasi gparted. Ini terutama berlaku untuk data terenkripsi di mana semua data dapat menjadi tidak dapat diakses secara permanen setelah kegagalan. Silakan lihat FAQ Cryptsetup untuk saran pencadangan dan pemulihan data terenkripsi.
Anda dapat memulai gparted dengan cara berikut:
- Menu
Pilih → .
- Baris perintah
Jalankan perintah berikut: gparted
Pada saat awal mula, gparted akan memindai komputer Anda untuk perangkat disk.
Saat Anda memulai gparted, jendela berikut ditampilkan:
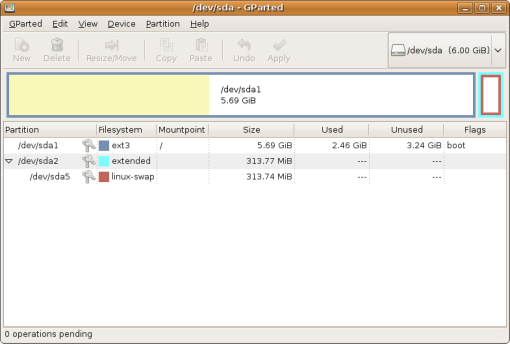
Jendela gparted berisi elemen berikut:
- Bilah Menu
Menu pada bilah menu berisi semua perintah yang Anda butuhkan untuk bekerja dengan perangkat disk dan partisi di gparted.
- Bilah Alat
Bilah alat berisi kumpulan perintah yang dapat Anda akses dari bilah menu.
- Area Tampilan Grafik
Area tampilan grafis berisi representasi visual partisi pada perangkat disk yang dipilih.
- Area Tampilan Teks
Area tampilan teks berisi daftar teks partisi pada perangkat disk yang dipilih.
- Bilah Status
Bilah status menampilkan informasi tentang aktivitas gparted saat ini atau banyaknya operasi yang tertunda.
- Panel Informasi Perangkat
Panel informasi perangkat menampilkan detail tentang perangkat disk yang dipilih.
Secara default panel informasi perangkat tidak diperlihatkan. Untuk memperlihatkan panel informasi perangkat, pilih → .
- Panel Operasi Tertunda
Panel operasi yang tertunda menampilkan daftar operasi partisi saat ini dalam antrean.
Secara default panel operasi tertunda tidak diperlihatkan ketika ada 0 operasi yang tertunda. Untuk memperlihatkan panel operasi yang tertunda, pilih → .
Saat Anda mengklik kiri di salah satu area tampilan, Anda memilih partisi yang akan digunakan untuk tindakan penyuntingan partisi.
Saat Anda mengklik kanan di salah satu area tampilan, aplikasi menampilkan menu popup. Menu popup berisi tindakan penyuntingan partisi yang paling umum.
Seperti aplikasi GNOME lainnya, tindakan dalam gparted dapat dilakukan dengan beberapa cara: dengan menu, dengan bilah alat, atau dengan tombol pintasan.
Untuk melihat tindakan yang didukung pada sistem berkas, pilih: → . Aplikasi menampilkan dialog Dukungan Sistem Berkas.
Jika Anda telah menginstal perangkat lunak saat gparted berjalan, klik untuk menyegarkan bagan. Aplikasi menyegarkan tampilan bagan.
Untuk menutup dialog Dukungan Sistem Berkas, klik .
Untuk memilih perangkat disk, pilih: → dan pilih perangkat dari daftar. Aplikasi menampilkan tata letak partisi perangkat di jendela gparted.
Untuk melihat informasi tentang perangkat disk:
Pilih perangkat cakram. Lihat bagian bernama “Memilih Perangkat”.
Pilih: → . Aplikasi membuka panel samping di jendela gparted dan menampilkan informasi tentang perangkat.
Untuk menutup panel sisi Informasi Perangkat, batal pilih: → .
Untuk menyegarkan semua perangkat disk, pilih: → . Aplikasi ini memindai ulang semua perangkat disk dan menyegarkan tata letak partisi perangkat di jendela gparted.
Untuk membuat tabel partisi baru di perangkat disk:
Pilih perangkat cakram. Lihat bagian bernama “Memilih Perangkat”.
Pilih: → . Aplikasi menampilkan dialog Buat tabel partisi pada
/path-ke-perangkat.Secara opsional pilih tipe tabel partisi yang berbeda dari daftar.
Catatan
Jenis tabel partisi default adalah untuk disk berukuran lebih kecil dari 2 Tebibyte (dengan asumsi ukuran sektor byte 512) dan untuk disk 2 Tebibyte dan lebih besar.
Lihat bagian bernama “Menentukan Tipe Partisi” untuk batasan tabel partisi .
Catatan
Untuk menggunakan disk tanpa tabel partisi, pilih untuk membuat partisi virtual yang membentang disk. Kemudian format ke sistem berkas yang diinginkan.
Lihat bagian bernama “Memformat Partisi” untuk memformat partisi virtual dengan sistem berkas.
Perhatian
Banyak sistem operasi mengenali tabel partisi dan , tetapi tidak mengenali semua jenis sistem berkas. Kurangnya pengenalan sistem berkas ini berarti bahwa menggunakan disk tanpa tabel partisi melibatkan lebih banyak risiko. Misalnya, beberapa sistem operasi mungkin meminta untuk memformat disk yang tidak dipartisi jika sistem berkas tidak dikenali.
Klik untuk membuat tabel partisi baru. Aplikasi menulis tabel partisi baru ke perangkat disk. Aplikasi ini menyegarkan tata letak partisi perangkat di jendela gparted.
Perhatian
PERINGATAN: Ini akan MENGHAPUS SEMUA DATA pada SELURUH PERANGKAT DISK.
Jika Anda secara tidak sengaja menimpa tabel partisi Anda, lihat bagian bernama “Memulihkan Tabel Partisi”.
Untuk mencoba penyelamatan data dari perangkat disk:
Pilih perangkat cakram. Lihat bagian bernama “Memilih Perangkat”.
Pilih: → . Aplikasi menampilkan dialog Cari sistem berkas pada
/path-ke-perangkat.Klik untuk memulai pemindaian disk lengkap.
Tip
Perangkat disk besar dapat memakan waktu sangat lama untuk dipindai. Jika Anda tidak memiliki waktu untuk menunggu pemindaian disk lengkap, maka klik .
Catatan
Maksimum 4 partisi dengan sistem berkas mungkin ditemukan. Jika Anda ingin menemukan lebih dari 4 partisi dan memulihkan tabel partisi, lihat bagian bernama “Memulihkan Tabel Partisi”.
Ketika pemindaian disk lengkap selesai, salah satu dari dua dialog yang mungkin akan ditampilkan:
Tidak ada sistem berkas yang ditemukan pada
/path-ke-perangkatJika tidak ada sistem berkas yang ditemukan, Anda memiliki opsi lain untuk mencoba menyelamatkan data Anda. Aplikasi photorec dirancang untuk membantu memulihkan berbagai jenis berkas yang hilang. Untuk informasi selengkapnya tentang photorec, lihat https://www.cgsecurity.org/wiki/PhotoRec.
Klik untuk menutup kotak dialog, dan akhiri upaya ini untuk menyelamatkan data.
Sistem berkas ditemukan pada
/path-ke-perangkatJika sistem berkas ditemukan, setiap sistem berkas ditampilkan dalam daftar bersama dengan tombol . Dialog akan menunjukkan apakah ada inkonsistensi data. Inkonsistensi dalam data mungkin mencegah Anda melihat data.
Untuk menyelamatkan data, gunakan langkah-langkah berikut bagi setiap sistem berkas:
Klik untuk mengait dan menampilkan sistem berkas. Manajer berkas baku Anda dibuka dan menampilkan tilikan sistem berkas hanya-baca.
Catatan
Jika dialog Tidak bisa membuka manajer berkas baku ditampilkan, maka Anda perlu membuka suatu manajer berkas dan menavigasi ke titik kait bagi sistem berkas.
Titik kait ditampilkan dalam dialog, misalnya "/tmp/gparted-roview-XXXXXX".
Klik untuk menutup dialog Tidak bisa membuka manajer berkas baku.
Gunakan manajer berkas untuk menyalin data Anda ke media penyimpanan lain.
Setelah selesai menyalin data, tutup manajer berkas.
Ketika Anda selesai menyelamatkan data, klik untuk mengakhiri upaya ini untuk menyelamatkan data. Aplikasi ini melepas kait sistem berkas apa pun yang dikait untuk dilihat. Kemudian aplikasi memindai ulang semua perangkat disk dan menyegarkan tata letak partisi perangkat dalam jendela gparted.
Tindakan ini tidak akan mengubah partisi pada perangkat disk Anda.
Untuk memilih partisi, gunakan salah satu hal berikut:
Klik pada partisi di area tampilan grafis.
Klik pada partisi di area tampilan teks.
Aplikasi menyoroti partisi di area tampilan grafis dan area tampilan teks di jendela gparted.
Catatan
Operasi partisi seperti menghapus, memindahkan, menyalin, memformat, memeriksa, label, dan sering mengubah ukuran mengharuskan partisi untuk dilepas kait. Lihat bagian bernama “Melepas Kait Partisi”.
Untuk memilih ruang yang tidak dialokasikan, gunakan salah satu hal berikut:
Klik pada tidak dialokasikan di area tampilan grafik.
Klik pada tidak dialokasikan di area tampilan teks.
Aplikasi ini menyoroti ruang yang tidak dialokasikan di area tampilan grafis dan area tampilan teks di jendela gparted.
Tip
Jika Anda tidak memiliki perangkat disk dengan ruang yang tidak dialokasikan, Anda dapat mencoba yang berikut ini:
Menambahkan perangkat diska baru ke komputer Anda.
Perkecil partisi yang berisi ruang tak terpakai. Lihat bagian bernama “Mengubah Ukuran Partisi”.
Untuk melihat informasi tentang suatu partisi:
Pilih suatu partisi. Lihat bagian bernama “Memilih Partisi”.
Pilih: → . Aplikasi membuka sebuah dialog Informasi tentang
/path-ke-partisi.
Untuk menutup dialog Informasi tentang /path-ke-partisi, klik .
Untuk mengait suatu partisi:
Pilih suatu partisi yang tidak dikait. Lihat bagian bernama “Memilih Partisi”.
Pilih: → dan pilih titik kait dari daftar. Aplikasi ini mengait partisi pada titik kait dan menyegarkan tata letak partisi perangkat dalam jendela gparted.
Catatan
Jika → tidak terlihat, maka gparted tidak tahu di mana partisi harus dikait.
Untuk melepas kait partisi:
Pilih partisi yang dikait. Lihat bagian bernama “Memilih Partisi”.
Pilih: → . Aplikasi melepas kait partisi dari titik kait dan menyegarkan tata letak partisi perangkat di jendela gparted.
Tip
Jika → tidak berhasil, maka partisi mungkin sedang digunakan.
Agar semua partisi dilepas kait dan tersedia untuk tindakan penyuntingan partisi, boot dari Live CD dan gunakan gparted. Lihat bagian bernama “Memperoleh GParted di Live CD”
Untuk membuka partisi terenkripsi LUKS:
Pilih partisi terenkripsi LUKS yang tertutup. Lihat bagian bernama “Memilih Partisi”.
Pilih: → .
Jika gparted belum mengetahui Frasa Sandi LUKS, itu akan membuka dialog Frasa Sandi LUKS
/path-ke-partisi. Ketik Frasa Sandi LUKS ke dalam kotak teks Frasa Sandi dan klik .Aplikasi ini membuka partisi terenkripsi dan menyegarkan tata letak partisi perangkat di jendela gparted.
Catatan
gparted mengingat setiap Frasa Sandi LUKS dalam memori komputer selama berjalan. Ini agar tidak perlu bertanya ketika membuka kembali partisi terenkripsi yang sama lagi. Ketika gparted ditutup semua frasa sandi LUKS yang diingat dibersihkan dari memori dan dilupakan.
Untuk menutup partisi terenkripsi LUKS:
Pilih partisi terenkripsi LUKS dan tidak dikait. Lihat bagian bernama “Memilih Partisi”.
Pilih: → . Aplikasi menutup enkripsi LUKS dan menyegarkan tata letak partisi perangkat di jendela gparted.
Tindakan ini akan mengubah partisi pada perangkat disk Anda. Tindakan ini tidak akan mengubah batas awal atau akhir dari partisi yang ada.
Untuk membuat partisi baru:
Pilih ruang yang belum dialokasikan pada perangkat diska. Lihat bagian bernama “Memilih Ruang Tak Dialokasikan”.
Pilih: → . Aplikasi menampilkan dialog Buat Partisi baru.
Tentukan ukuran dan lokasi untuk partisi. Lihat bagian bernama “Menentukan Ukuran dan Lokasi Partisi”.
Tentukan perataan untuk partisi. Lihat bagian bernama “Menentukan Perataan Partisi”.
Tentukan tipe partisi. Lihat bagian bernama “Menentukan Tipe Partisi”.
Tentukan nama partisi ketika ruas diaktifkan. Lihat bagian bernama “Menentukan Nama Partisi”.
Tentukan tipe sistem berkas untuk partisi. Lihat bagian bernama “Menentukan Sistem Berkas Partisi”.
Tentukan label sistem berkas untuk partisi. Lihat bagian bernama “Menentukan Label Sistem Berkas Partisi”.
Klik untuk menambahkan operasi membuat partisi ke antrean operasi. Aplikasi menampilkan operasi membuat partisi di panel Operasi Tertunda di jendela gparted.
To delete a partition:
Select an unmounted partition. See bagian bernama “Memilih Partisi”.
Choose: → . The application displays the delete partition operation in the Pending Operations pane.
Perhatian
If you delete a logical partition, then all existing logical partitions after the deleted logical partition will experience changes in device names.
For example, an extended partition contains four logical partitions A, B, C, and D. These logical partitions are accessed by the operating system as follows:
Partisi A sebagai /dev/sda5.
Partisi B sebagai /dev/sda6.
Partisi C sebagai /dev/sda7.
Partisi D sebagai /dev/sda8.
If partition B is deleted, then the remaining logical partitions will be accessed by the operating system as follows:
Partisi A sebagai /dev/sda5.
Partisi C sebagai /dev/sda6. Perhatikan perubahan nama perangkat.
Partisi D sebagai /dev/sda7. Perhatikan perubahan nama perangkat.
Changes in a device name can cause problems if a partition is mounted using a device name. You can avoid the problem by using the file system label or Universally Unique Identifier (UUID) of the partition when mounting the partition.
Changes in a device name might adversely affect the following files:
/etc/fstab - Contains a list of file systems to mount.
/boot/grub/menu.lst - Contains operating system boot instructions for the grub boot loader.
Catatan
Disks with or partition tables do not contain a partition table, and do not contain partitions. A file system on a disk without a partition table is represented in GParted by a virtual partition.
To delete the file system and virtual partition, choose format to .
Catatan
Naming of partitions is only available with GUID partition tables (GPT).
Lihat juga bagian bernama “Membuat Tabel Partisi Baru”.
Untuk mengatur nama partisi:
Pilih suatu partisi yang tidak dikait. Lihat bagian bernama “Memilih Partisi”.
Choose: → . The application opens a Set partition name on
/path-to-partitiondialog.Type a partition name in the Name text box.
Click . The application displays the set partition name operation in the Operations Pending pane.
Untuk memformat partisi:
Pilih suatu partisi yang tidak dikait. Lihat bagian bernama “Memilih Partisi”.
Choose: → , and select a type of file system from the list. The application displays the format partition operation in the Operations Pending pane.
See bagian bernama “Menentukan Sistem Berkas Partisi” for the meaning of the file system type.
To set a label or a volume name of a file system in a partition:
Select an unmounted partition. See bagian bernama “Memilih Partisi”.
Choose: → . The application opens a Set file system label on
/path-to-partitiondialog.Type a label name in the Label text box.
Click . The application displays the set file system label operation in the Operations Pending pane.
To change the Universally Unique Identifier (UUID) of a partition:
Select an unmounted partition. See bagian bernama “Memilih Partisi”.
Choose: → . The application displays the set a new random UUID operation in the Operations Pending pane.
Warning
Changing the UUID might invalidate the Windows Product Activation key (WPA).
On FAT and NTFS file systems, the Volume Serial Number is used as UUID. Changing the Volume Serial Number on the Windows system partition, normally C:, might invalidate the WPA key. An invalid WPA key will prevent login until you reactivate Windows.
In an attempt to avoid invalidating the WPA key, on NTFS file systems only half of the UUID is set to a new random value. On FAT file systems, such a precaution is not possible.
The WPA key should not be affected by changing the UUID of data partitions or removable media partitions. In rare cases, a partition that is present at boot time might be an exception to this rule.
Warning
Changing the UUID when there is no need to do so might cause a GNU/Linux system to fail to boot, or to fail to mount a file system.
Changing the UUID is only required after copying a partition. The UUID change is needed to prevent duplicate UUIDs when both the source and the copy of the partition are used on the same computer.
If boot or mount problems occur you might need to edit configuration files, such as /etc/fstab, and regenerate the grub menu to ensure that the correct UUID is specified.
Menentukan detail partisi berguna saat melakukan tindakan seperti membuat, mengubah ukuran, dan memindahkan.
To specify the size and the location of the partition, use one or a combination of the following:
Click-and-hold the arrow at either end of the graphic area. Drag the arrow left or right within the display range.
Click-and-hold the middle of the partition in the graphic area. Drag the partition left or right within the display range.
Click the spin button arrows, or type numeric values to adjust the following fields:
Free Space Preceding
New Size
Free Space Following
The application refreshes both the graphic area and the numbers beside the three field labels.
To specify the alignment of the partition, click the Align to arrow button, and select from the list.
Use MiB alignment for modern operating systems. This setting aligns partitions to start and end on precise mebibyte (1,048,576 byte) boundaries. MiB alignment provides enhanced performance when used with RAID systems and with Solid State Drives, such as USB flash drives.
Use Cylinder alignment to maintain compatibility with operating systems released before the year 2000, such as DOS. This setting aligns partitions to start and end on disk cylinder boundaries.
Tip
The Cylinder/Head/Sector values reported by modern disk devices no longer have a direct physical relationship to the data stored on the disk device. Hence it is no longer valid to use this alignment setting to achieve enhanced performance.
Use None only if you have an in-depth knowledge of disk structure, partition tables, and boot records. This setting places partition boundaries relative to the end of any immediately preceding partition on the disk device. This setting is not guaranteed to reserve or respect space required for boot records.
To specify the partition type, click the Create as arrow button, and select from the list.
Catatan
The msdos partition table limits partitions as follows:
Maximum of 4 primary partitions.
Maximum of 3 primary partitions, and 1 extended partition.
The extended partition can contain multiple logical partitions. Some GNU/Linux distributions support accessing at most 15 partitions on a disk device.
Maximum size of a partition is 2 Tebibytes using a sector size of 512 bytes. The partition must also start within the first 2 Tebibytes of the disk device.
Tip
Primary partitions provide better data recoverability because the partition boundaries are stored at known locations on the disk device.
Catatan
Naming of partitions is only available with GUID partition tables (GPT). Therefore the field is only enabled on disk devices partitioned using GPT.
Lihat juga bagian bernama “Membuat Tabel Partisi Baru”.
To specify the partition name, type the name in the Partition name text box.
To specify the type of file system for the partition, click the File System arrow button, and select from the list.
Catatan
Examples of uses for some file systems are as follows:
, and file systems can be used for installing GNU/Linux, and for data.
can be used with GNU/Linux to increase the virtual memory of your computer.
and file systems can be used to share data between free and commercial operating systems.
can be used to clear any existing file system signatures and ensure that the partition is recognised as empty.
can be used to just create a partition without writing a file system.
To specify the file system label in the partition, also known as a volume label, type a label name in the Label text box.
Tip
File system labels can be used to help you remember what is stored in the partition.
Unique labels can be used to mount file systems with the GNU/Linux operating system.
These actions will alter partitions on your disk device. These actions might modify the start or end boundaries of your existing partitions. These actions might cause operating systems to fail to boot.
Resizing and moving a partition can be performed by a single gparted operation.
To resize a partition:
Select a partition. See bagian bernama “Memilih Partisi”.
Tip
Unmounted or inactive partitions enable the most resize options.
Support is available for online resize of some mounted or otherwise active partitions. However this support is often limited to grow only.
Choose: → . The application displays the Resize/Move
/path-to-partitiondialog.Adjust the size of the partition. See bagian bernama “Menentukan Ukuran dan Lokasi Partisi”.
Tip
If you do not want the start of an existing partition to move, then do not change the free space preceding value. If the partition is mounted or otherwise active, then you will not be able to change the free space preceding value.
Specify the alignment of the partition. See bagian bernama “Menentukan Perataan Partisi”.
Click . The application displays the resize/move partition operation in the Pending Operations pane.
Examine the operation that was added to the Pending Operations pane.
If the operation involves a move step, then consider the following:
A move step might take a long time to complete.
If the partition is an operating system boot partition, then a move step might cause the operating system to fail to boot.
If you are not prepared to wait or to fix potential operating system boot problems, then you might want to undo the operation. See bagian bernama “Membatalkan Operasi Terakhir”.
Tip
To grow or move a partition, unallocated space must be available adjacent to the partition.
If you are growing a logical partition, then the unallocated space must be within the extended partition.
If you are growing a primary partition, then the unallocated space must not be within the extended partition.
You can move unallocated space to be inside or outside of the extended partition by resizing the extended partition boundaries.
Tip
A LUKS encrypted partition and the file system within can only be resized when the encryption mapping is open.
Tip
To improve the ability to shrink NTFS partitions, you might consider one or more of the following:
Defragment the file system.
Booting into Safe Mode with the commercial operating system that uses NTFS can improve the ability to defragment the file system. To enter Safe Mode press F8 while your computer is booting the operating system.
Check the partition for errors with the following command:
C:>chkdsk /f /rRemember to reboot back into the commercial operating system that uses NTFS to allow the chkdsk command to execute.
Temporarily disable the paging file. The paging file occupies a fixed location in the partition that the defragmentation process is unable to move.
Temporarily move large files to another partition or disk device. Large files are defined as greater than a few hundred Megabytes (MB).
Ensure a proper shut down of the commercial operating system that uses NTFS before you resize the NTFS partition
Leave at least 10 percent unused space in the NTFS partition. If you shrink the partition too much, then the commercial operating system might have difficulty functioning properly.
Reboot twice into the commercial operating system that uses NTFS after shrinking the NTFS partition.
Moving and resizing a partition can be performed by a single gparted operation.
Untuk memindahkan partisi:
Pilih suatu partisi yang tidak dikait. Lihat bagian bernama “Memilih Partisi”.
Choose: → . The application displays the Resize/Move
/path-to-partitiondialog.Sesuaikan lokasi partisi. Lihat bagian bernama “Menentukan Ukuran dan Lokasi Partisi”.
Tentukan perataan partisi. Lihat bagian bernama “Menentukan Perataan Partisi”.
Click . The application displays the resize/move partition operation in the Pending Operations pane.
Tip
If the partition is an operating system boot partition, then the operating system might not boot after the move operation is applied.
If the operating system fails to boot, see bagian bernama “Memperbaiki Masalah Boot Sistem Operasi”.
Tip
A LUKS encrypted partition can only be moved when the encryption mapping is closed.
To copy a partition:
Select an unmounted partition. See bagian bernama “Memilih Partisi”.
Choose: → . The application marks the partition as the source partition.
To Paste a partition:
Select an unallocated space on a disk device. See bagian bernama “Memilih Ruang Tak Dialokasikan”.
Choose: → . The application displays the Paste
/path-to-partitiondialog.If you want you can adjust the size and location of the partition. See bagian bernama “Menentukan Ukuran dan Lokasi Partisi”.
If you want you can specify the alignment of partition. See bagian bernama “Menentukan Perataan Partisi”.
Click . The application displays the copy partition operation in the Pending Operations pane.
Perhatian
The copy of the partition has the same file system label and Universally Unique Identifier (UUID) as the source partition. This can cause a problem when booting, or when mount actions use the file system label or UUID to identify the partition.
The problem is that the operating system will randomly select to mount either the source, or the copy of the partition. For example, on the first mount action the source partition might be mounted. On the next mount action the copy of the partition might be mounted. Over time this random nature of partition mounting might make files seem to mysteriously appear or disappear depending upon which partition is mounted. Random mounting of the source or the copy of the partition might also cause severe data corruption or loss.
To avoid the problem you are advised to do one of the following:
After you have queued or applied the copy operation:
Change the UUID of either the source, or the copy of the partition. See bagian bernama “Changing a Partition UUID”.
If the file system label is not blank then change the file system label of either the source, or the copy of the partition. See bagian bernama “Mengatur Label Sistem Berkas Partisi”.
After you have applied the copy operation, delete or reformat the source partition.
Use some other method to ensure that the source partition and the copy of the partition are not used on the same computer at the same time. For example, if the copy of the partition is on a separate drive then remove the drive from the computer.
Tip
The file system within a LUKS encrypted partition can only be copied when the encryption mapping is open.
Catatan
To prevent unintended decryption of data, pasting into unallocated space creating a new partition is not permitted. However a LUKS encrypted partition can be pasted into an existing open LUKS encrypted partition maintaining an encrypted, or pasted into a plain partition making an unencrypted copy of the file system.
To manage partition flags:
Select a partition. See bagian bernama “Memilih Partisi”.
Choose: → . The application opens a Manage flags on
/path-to-partitiondialog.To enable a flag, select the check box beside the flag. The application writes the enabled flag to the partition and refreshes the Manage flags on
/path-to-partitiondialog.To disable a flag, deselect the check box beside the flag. The application writes the disabled flag to the partition and refreshes the Manage flags on
/path-to-partitiondialog.
Note
is only available for disks with partition tables. Disks with or partition tables do not contain a partition table, and do not have partition flags.
See bagian bernama “Melihat Informasi Perangkat” to view the type of partition table.
To close the Manage flags on
/path-to-partition dialog,
click .
Catatan
A description of flags in an msdos partition table follows:
Boot is used by some commercial operating system boot loaders. The boot flag indicates the partition is active or bootable. Only one partition on a disk device can be active.
Diag is used to indicate the partition is used for diagnostics / recovery.
ESP indicates an EFI System Partition used to boot computers with the Unified Extensible Firmware Interface (UEFI) class 2 that includes compatibility support for BIOS functions including the MBR partition structure.
Hidden is used by some commercial operating systems. The hidden flag makes the partition invisible to the operating system.
Irst identifies an Intel Rapid Start Technology partition.
LBA is used by some commercial operating system boot loaders. The LBA flag indicates the partition should be accessed using Logical Block Addressing (LBA), instead of Cylinder-Head-Sector (CHS) addressing.
LVM is used to indicate the partition is used by a Logical Volume Manager (LVM).
Palo is used by the Precision Architecture - Reduced Instruction Set Computing (PA-RISC) boot loader, palo.
Prep is used to indicate the boot partition on Power Performance Computing (PowerPC) hardware.
RAID is used to indicate the partition is used in a Redundant Array of Inexpensive Disks (RAID).
Catatan
A description of flags in a gpt partition table follows:
Atvrecv is used to indicate an Apple TV Recovery partition.
BIOS_GRUB indicates a BIOS boot partition often used by the GRUB 2 boot loader.
Boot is used by some commercial operating system boot loaders. The boot flag indicates the partition is active or bootable. Only one partition on a disk device can be active.
Diag indicates the partition is used for diagnostics or recovery.
ESP indicates an EFI System Partition used to boot computers with Extensible Firmware Interface (EFI) class 1 or Unified Extensible Firmware Interface (UEFI) class 2 or UEFI class 3.
Hidden is used by some commercial operating systems. The hidden flag makes the partition invisible to the operating system.
HP-service is used to indicate a Hewlett Packard service partition.
Irst identifies an Intel Rapid Start Technology partition.
Legacy_boot is used by some special purpose software to indicate the partition might be bootable.
LVM indicates the partition is used by a Logical Volume Manager (LVM).
Msftdata identifies partitions that contain Microsoft file systems such as NTFS or FAT.
Msftres is used to indicate a Microsoft Reserved partition.
Prep is used to indicate the boot partition on Power Performance Computing (PowerPC) hardware.
RAID indicates the partition is used in a Redundant Array of Inexpensive Disks (RAID).
Checking a partition will attempt to find and fix problems in the file system. Checking a partition will attempt to grow the file system to fill the partition.
Untuk memeriksa partisi:
Pilih suatu partisi yang tidak dikait. Lihat bagian bernama “Memilih Partisi”.
Choose: → . The application displays the check partition operation in the Pending Operations pane.
To undo the last operation in the operation queue, choose: → . The application removes the last operation from the queue displayed in the Pending Operations pane. If there are no operations remaining in the queue, the application closes the Pending Operations pane.
To clear all operations in the operation queue, choose: → . The application removes all operations from the queue and closes the Pending Operations pane.
Untuk menerapkan semua operasi:
Choose: → . The application displays an Apply operations to device dialog.
Perhatian
Editing partitions has the potential to cause LOSS of DATA. You are advised to backup your data before applying your partition editing operations.
Click . The application displays an Applying pending operations dialog. The application applies each pending operation in the order you created the operations. The application displays a status update when each operation is completed.
To view more information, click . The application displays more details about operations.
To view more information about the steps in each operation, click the arrow button beside each step.
To stop the operations while they are executing, click . The application displays a disabled button and counts down for 5 seconds.
Catatan
instructs the application to stop or roll back operations as necessary to ensure data integrity.
If operations have not halted after 5 seconds the application enables the button.
To force the operations to stop, click . The application displays a warning dialog.
Click to allow the roll back operations to complete, or click to cancel the roll back operations.
Awas
terminates the safe roll back of operations and might cause SEVERE file system damage and data loss. You are advised to click to allow the roll back to complete.
When the application finishes performing operations, the application displays the button and the button.
If you want to save the details from applying all operations, then click . The application displays a Save Details dialog.
If you want to change the default file name, then type a file name in the Name text box.
If you want to save the file in a folder different than /root, click . The application displays a file system navigator.
Use the file system navigator to select a folder.
Click to save the file. The application saves the details file.
Perhatian
If you use gparted from a Live CD, then the root file system exists in RAM memory. All files saved to the Live CD root file system will be lost when you shut down the computer.
If you saved the gparted details to the Live CD root file system, then you need to copy the file to more permanent storage. Examples of more permanent storage are a hard disk drive or a USB flash memory drive.
Click . The application closes the Applying pending operations dialog. The application rescans all the disk devices and refreshes the device partition layout in the gparted window.
A Live CD is a Compact Disc that contains a bootable operating system. A Live CD enables you to boot your computer from the CD.
Using gparted from a Live CD has the following advantages:
You can edit all of your partitions because the partitions are not mounted.
You can edit partitions on computers that do not have a bootable operating system.
The gparted application is available on many Live CD distributions.
You can download a Live CD image containing gparted from the following web sites:
GParted Live CD https://gparted.org/livecd.php
SystemRescue (also known as SystemRescueCD) https://www.system-rescue.org
Tip
The GParted Live CD image can be written to a USB flash drive.
If your computer can boot from Universal Serial Bus (USB) then you might prefer to boot and use gparted from a USB flash drive.
Tip
To avoid wasting a blank CD when burning a CD image file, use the following tips:
Ensure the checksum of the downloaded file matches the checksum posted on the download page.
Be sure to burn the .iso file as an image to the blank CD. If you burn the .iso file as data to a blank CD then the CD will not boot in your computer.
Your computer might fail to boot an operating system when you perform one of the following actions:
Delete a partition.
Move a partition.
Install another operating system and overwrite the Master Boot Record (MBR).
Fortunately the failure to boot can be often be fixed.
If your computer uses the GRUB boot loader, see bagian bernama “Memperbaiki masalah boot GRUB” to restore the ability to boot.
If your computer does not use GRUB then you are advised to consult documentation for your boot loader to learn how to fix the problem. You might consult the GParted FAQ, or the GParted forum. You might also search the Internet to learn how other people have solved similar problems.
The Grand Unified Boot loader (GRUB) is used by many GNU/Linux distributions. To fix GRUB boot problems you start by determining which major version of GRUB was used.
There are two major versions of GRUB:
GRUB, also known as GRUB 2, covers versions 1.98 and higher. GRUB 2 works with both GUID partition tables (GPT) and msdos partition tables.
GRUB Legacy, traditionally known as GRUB, covers versions 0.9x and earlier. GRUB Legacy works with msdos partition tables only.
GRUB 2 is used as the default boot loader in the following GNU/Linux distributions:
CentOS 7 and higher
Debian 6 (Squeeze) and higher
Fedora 16 (Verne) and higher
openSUSE 12.2 and higher
Ubuntu 9.10 (Karmic Koala) and higher
If you are unsure whether your computer uses GRUB 2 or GRUB Legacy, you might try searching for the answer on the Internet.
Use the following steps to restore the GRUB 2 boot loader:
Boot from Live media such as GParted Live or your GNU/Linux distribution image. Open a terminal window.
Determine which partition contains the / file system for your GNU/Linux distribution.
Use GParted to list the partitions on your disk device. Look for a partition that contains your GNU/Linux / file system. This Linux partition will likely use a file system such as ext2, ext3, ext4, or btrfs.
Note
If the / partition is on LVM then the Logical Volume Manager must be active. LVM can be started with the command:
#vgchange -a yWith LVM, the equivalent of a disk partition is a Logical Volume. Logical Volumes can be listed with the command:
#lvscanNote
If the / partition is on RAID, then the RAID must be active. Linux Software RAID can be started with the command:
#mdadm --assemble --scanCreate a mount point directory by entering (as root):
#mkdir /tmp/mydirMount the / partition on the mount point directory. For example assume the / file system is contained in the /dev/sda5 partition. Enter (as root):
#mount/dev/sda5/tmp/mydirIf you have a separate /boot partition, for example at /dev/sda3, then an extra step is required. Mount the /boot partition at /tmp/mydir/boot by entering (as root):
#mount/dev/sda3/tmp/mydir/bootNote
If you do not know whether you have a separate boot partition then you probably do not and can ignore this step.
Prepare to change the root environment by entering (as root):
#mount --bind /dev /tmp/mydir/dev#mount --bind /proc /tmp/mydir/proc#mount --bind /sys /tmp/mydir/sysChange the root environment by entering (as root):
#chroot /tmp/mydirReinstall GRUB 2 on the boot device. Note that the device name is used and not the partition name. For example, if the / partition is /dev/sda5 then the device is /dev/sda.
For Debian, Ubuntu, and other offshoot GNU/Linux distributions, enter the command (as root):
#grub-install/dev/sdaFor CentOS, Fedora, openSUSE and other offshoot GNU/Linux distributions, enter the command (as root):
#grub2-install/dev/sdaExit the chroot environment by entering (as root):
#exitReboot your computer.
Use the following steps to restore the GRUB Legacy boot loader:
Boot from Live media such as your GNU/Linux distribution image. Open a terminal window.
Note
The Live media must contain the GRUB Legacy boot loader. If your GNU/Linux distribution uses GRUB Legacy, then the distribution Live media will also contain GRUB Legacy.
Start the grub application from the command line (as root).
#grubFind where grub stage1 is located by using one of the following:
If the /boot folder is stored in the / partition, use the command:
grub>find /boot/grub/stage1If the /boot folder is stored in a partition different than the / partition, use the command:
grub>find /grub/stage1The output from the find command might look like the following:
(hd0,0)If more than one line is listed in the command output, you will need to decide which device you use for grub.
Set the grub root device by specifying the device returned by the find command. This should be the partition containing the boot directory.
grub>root(hd0,0)Reinstall the grub boot loader into the Master Boot Record (MBR) with:
grub>setup(hd0)If you want to install the grub boot loader into the boot sector of a partition, instead specify a partition with:
grub>setup(hd0,0)Exit grub.
grub>quitReboot your computer.
Jika Anda secara tidak sengaja menimpa tabel partisi Anda, ada kemungkinan Anda mungkin dapat memulihkannya.
Aplikasi testdisk dirancang untuk membantu memulihkan partisi yang hilang. Untuk informasi selengkapnya tentang testdisk, lihat https://www.cgsecurity.org/wiki/TestDisk.
Aplikasi testdisk disertakan pada setiap Live CD yang tercantum di bagian bernama “Memperoleh GParted di Live CD”
